

Growing cannabis indoors takes patience. First, you have to select the right place and get the right growing equipment. Then, you need to choose cannabis seeds and decide whether you prefer soil or soilless growing. And finally, you’ve to spend a lot of time checking and maintain your harvest.
On top of everything else, you must ensure you’re operating within the boundaries of the law. Many US states still haven’t lifted the ban on growing cannabis, both indoors and outdoors. Make sure home cultivation is permitted in the area where you live before moving ahead.
Assuming you’re legally allowed to proceed, keep reading our step-by-step guide on how to grow cannabis indoors. We’ll show you how to select the right place for growing cannabis, whether you should go for soil or soilless growing, and more. Read on to know more.
Step 1: How To Select the Perfect Cannabis Grow Room

Keep in mind that you don’t need a large indoor space for growing cannabis. A small tent, an unused corner of a big room, or a designated area of your house is sufficient. That’s especially true for beginners who must start on a small scale.
Here are a few tips to help you get started:
- Start growing from a small plot. You don’t need to start with ten or twenty plants – one or two plants would do. An inevitable learning curve comes with growing weed indoors and you’re bound to put a few steps wrong. So it’s better to keep things small at the start.
- Sanitize and clean the plot. Pests and contaminants pose a massive risk to cannabis. A messy space might also become a breeding ground for harmful bacteria, mold, and pathogens. So it’s a good idea to clean the grow space at least twice every week.
‘Light Seal’ your growing space. Cannabis needs 13 hours of light per day in the vegetative stage and 12 hours of light in the flowering stage. The rest of the time they need darkness – overexposure to light will force them to overwork, potentially ruining their buds.
Step 2: How To Select Your Cannabis Grow Lights

Given that they need light for at least 12 hours daily, the light source you’d select will play a crucial role in determining the quality of your plants. If you plan on growing long term, we suggest you spend a significant portion of your budget on a lighting setup.
Here are the different types of best grow lights for cannabis:
LED Grow Lights: The best LED grow light bulbs run at cooler temperatures, offer a wide range of color spectrum and are incredibly energy efficient. They also stay cool to the touch and won’t radiate heat to your plants. You can trust them to improve your crop’s quality.
Fluorescent Grow Lights: Fluorescent grow lights may not last as long as LEDs and offer a weaker intensity light. That makes them ill-suited for cannabis in their flowering stages, but they’re still suitable for weed in the vegetative growth stage.
High Intensity Discharge: HID lights are extremely efficient, promote leafy growth and helps cannabis produce buds and flowers. You need two types of HID lights for weed – Metal Halide lights for the vegetative stage and HPS lights for flowering stage.
Incandescent Grow Lights: Incandescent grow lights are not ideal for cannabis. They produce abnormally high heat which can burn plants placed nearby. The energy efficiency of incandescent grow lights is also the lowest of all options we have seen above.
Step 3: How to Ventilate your Grow Room
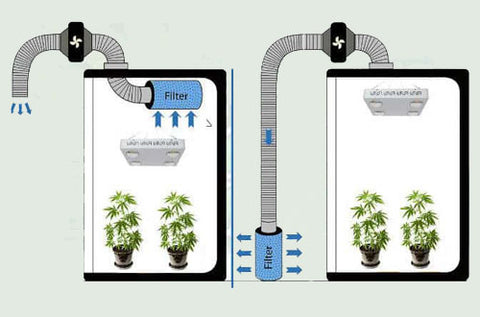
Cannabis plants need plenty of air to realize their growth potential. That’s why you must ensure that your entire plot receives consistent airflow. Use several types of fans, including stand fans, box fans, and oscillating fans to achieve this objective. Place the fans strategically to create good (and consistent) air flow across your entire space.
Since cold air goes down, your intake fans should be mounted low so they can supply a good supply of cool, CO2-rich fresh air to the plants. On the flip side, since warmer air rises, your exhaust fans should be mounted high so they can throw out how air. This technique won’t only keep your temperatures manageable. It will also help your plants receive a constant supply of fresh air.
Pro Tip: The majority of cannabis strains thrive in the 75- to 85-degrees Fahrenheit temperature range. Make sure your grow room’s temperature is within or close to this range.
Step 4: How to Develop a Control System

Given that you can’t spend the entire day in your grow room, you’d need a self-monitoring control system to control all your grow space’s parameters. It includes an adjustable thermostat that would help you turn on the fans once the temperature exceeds a certain limit.
You also need a 24-hour timer. When the weed plants are in their vegetative growth stage, they need you to keep the lights on for 16 to 24 hours a day. Once they reach the flowering stage, they need 12 hours of light and 12 hours of darkness.
You might also want to invest in a pH meter. It will let you keep an eye on your water and soil’s quality. If you’re growing weed hydroponically, keep the pH between 5.5 and 6.5. Conversely, if you’re growing your plants in soil, the pH sweet spot is somewhere between 6 and 7.
Step 5: How to Select a Cannabis Grow Medium

When growing cannabis indoors, you’re presented with two options. You can either grow in traditional soil. Or you could turn to a hydroponic tray. We recommend soil if you’re growing indoors for the first time – it’s more straightforward, cheaper, and offers more wiggle room than a hydroponic system.
Let’s compare and contrast both the options:
Soil vs. Soilless Growing
Soil is the preferred choice of beginner gardeners for three specific reasons. It offers a higher margin of error, is less expensive to maintain, and is more straightforward than a hydroponic system. However, that isn’t to say that you can select any soil you find on the market.
Make sure you get a high-grade horticultural potting mix for your cannabis plants. It is available in two types: “charged” which already has a few minerals to get you through the first few weeks, and “neutral” which needs fertilization right from the off. Choose whichever fits your budget.
However, if you can afford to pay extra for more abundant and faster yields, then you might want to experiment with hydroponic setups. Keep in mind, though, that hydroponic offers no wiggle room – you have to do everything correctly every time, all the time.
Hydroponic systems provide all required mineral salt nutrients to boost the plants’ growth. They are available in multiple types, including Food and Drain, Deep Water Culture or DWC, and Ebb and Flow. Click here to know more about hydroponic grow mediums.
Step 6: How to choose the right container for your cannabis plant

When it comes to containers, your marijuana needs only one thing: a safe place for healthy root development. If the plant lacks healthy roots, it won’t thrive. Roots are also responsible for nutrient absorption, water retention, anchoring the plant and facilitating its vegetative growth.
Keep these tips in mind to choose the right container for your cannabis plant:
Oxygen: Roots also need oxygen to thrive. Choose a container that provides as much oxygen as needed for root development, but not at the cost of exposing the root to the elements. Containers maintain this tricky balance through multiple styles of perforation.
Space: It isn’t only the buds of your cannabis plant that will branch out – roots will do the same, albeit away from your eyes. A container that is too narrow might cause the plant to become rootbound, choking its development.
Types of Pots for Cannabis Growing:
Plastic pots have low overhead costs, provide solid drainage and make transplanting a cinch, though they won’t protect the root from temperature fluctuation and aren’t ultra-durable, either. They may pose airflow issues, too.
Ceramic pots, meanwhile, offer less than ideal drainage. They are also extremely heavy and make it difficult to transport plants. On the flip side, their heavy weight allows them to anchor large plants. And ceramic pots can retain lower temperatures during summer days too.
Fabric containers offer the best of both worlds. They provide excellent drainage and assure increase airflow to the roots. This allows them to be conducive for healthy, dense root systems. Though they require more maintenance and moisture as fabric dries out quickly.
Step 7: Which Nutrients Are Best For Growing Cannabis?

If you want to grow premium-grade cannabis, giving your plants the right nutrients is extremely crucial. Otherwise, if you expose your weed to sub-optimal conditions or wrong nutrients, you’ll likely miss out on potency and yield.
Here are the nutrients that are best for growing cannabis:
- Nitrogen
- Phosphorous
- Potassium
- Calcium
- Magnesium
- Iron
- Copper
You can buy all these nutrients pre-packaged in powder or liquid form. However, if you have deep pockets, invest in “super soils” as they already contain these nutrients. Lastly, different strains of cannabis may need different type of nutrients. Do a little research on the specific strain you’re growing.
Step 8: How to Water & Flush Cannabis Plants

How much water and how often your cannabis plants need water is determined by a few things. They include the plant’s size, how fast it’s growing (the rate of photosynthesis) and its stage of development. Still, nobody can tell you for sure how much water and how often cannabis need.
Regardless, make sure you’re using RO filter. Excess levels of unfiltered minerals and chlorine might end up harming the plants. Tap water can also expose the plant’s roots to unnecessary minerals, potentially leading to root disease.
As for flushing cannabis plants, make sure the growing container has holes to let water out. Also, when you’re watering your marijuana plants, just moisten the soil. Don’t saturate it. And make sure you only water the plants when they’re dry. This is known as cycling.
Step 9: Check Out On Your Plants Every Day

Unless you’re a full-time grower, it might be difficult for you to keep a 24/7 eye on your indoor plants. Still, you might want to set aside a few minutes every day if you’re serious about giving your plants adequate care.
Regular checks, such as ensuring things like humidity, pH, temperature and water levels are correct, are essential for the long-term health of your plants. Lastly, if you want to grow high-THC buds, remove male plants from female plants. Here’s how you can identify male and female cannabis plants.
Final Step: How To Harvest Cannabis Plants

Start by cutting off the fan leaves, also known as the big water leaves. The reason why you’d be doing that is that they have minimal THC in them. You’ll then notice two types of leaves: the smaller sugar leaves and the longer, green fan leaves. Separate both after cutting them.
If you wish to enjoy an intoxicating high, go for the clean leafless nugs. However, if you are one of those people who like the taste of cannabutter, then you must turn your attention to the sugar leaves. Some people also like grinding sugar leaves before putting them to use.
After you have harvested the plant, hang the buds up to air dry. Then, after a period of 7 to 10 days, place them in airtight containers. The longer the time you give your buds for air drying, the better they will taste. And they will also be more potent.